
I normally don’t paint portraits of smiling people. It just doesn’t have the weight of a more sober pose. And it’s darned difficult to pull off. If not well done, teeth tend to get all snaggly in a painting.
But for a recent portrait, I completely agreed with the client that, for a variety of reasons, a smiling portrait was the best possible choice.
I ALWAYS make a study (or two or three) before embarking on a painting. Since the smiling mouth presented the most difficult challenge, I did a small version of that. And for once in my painting/blogging life, I had the presence of mind to have my camera out and take photos of the process to share on this blog. So here we go. How to paint teeth in watercolor.
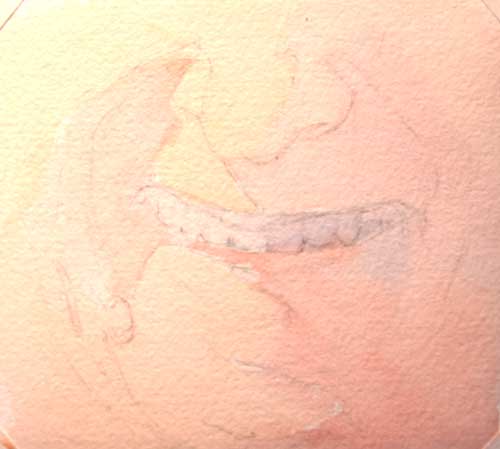
Start with a line drawing

For a portrait, I always start with a detailed line drawing. This is the most time-consuming stage, as this is where I do much of my thinking and planning. Here are some of the things I think about:
- Shapes and the rhythms of those shapes (getting the shape of the teeth is most important, but I don’t worry about all the details. I concentrate on the general outline.)
- Lost and found edges
- Value and color within the shapes
It’s kind of like mapping a journey and getting an overall picture in my head of where I want to go, because I find that in watercolor, if I don’t know where I’m going, I’ll never get anywhere.
Adding the first light wash
On the day I met with the subject, I made some color studies. Using these studies for reference, I lay in the first light wash, keeping the warmest colors and lightest values in the lit areas of the portrait, and the cooler and darker values in the shadows.
I don’t preserve a lot of whites on my paper. They seem too harsh once I get the darkest values down. I like to have a light value tone to begin with, and preserve that through out the process.
To make this first wash soft and flowy, I make sure I have plenty of pure color mixed up with lots of water on my palette, ready to go so there’s no chance for the wash to dry into a hard edge.
Ack! It looks like Jabba the Hut! That’s why the next step is so important.
First dark values
The picture below is better, isn’t it? The dark green defines his face and neck. Whew.

I start adding color to build the forms and I start adding in the first of my darkest values. I use a dark red in the mouth, painting carefully around the teeth to preserve their shape. The red looks terrifically bright (it’s a little frightening at this stage!), but I know that I’m going to tone that down later with a blue or violet wash. A warm color like red or orange is a way to bring glowing light into the shadows.
Building form

I keep building form, continuing to think of hue, value, and those pesky edges. I love to paint into the shadows. Forms in the mass shadow also have temperature, hue, and value.
Continuing to build form

If you deconstruct the face, you’ll find that it’s really a collection of spheres and cylinders. As I’m painting, I’m thinking about those shapes rather than thinking of the painting as a face.
I know this looks rather alarming, but I’ll keep adding light washes, and eventually it will come together.
Final image

Many layers of transparent paint, and a final light wash of ultramarine blue, it will come together—or not. The use of blue and violet on the lips was a mistake. It looks like Grampa Munster‘s smile. So I’ll leave this tutorial with a bit of a cliff hanger. Can I repair it? Stay tuned for the next episode of The Watercolorist in Fix-it Mode!
Linkage:
Big time portrait painter John Howard Sanden has a good essay on the question of the smile.
How to draw a sphere

Perfetto! Thank you for being so generous and sharing your technique with us. I can definitely use this.
I’m glad you can use this information. I’ll look forward to seeing more of your work on your blog.
I LOVE seeing (and reading about) your process—-and noticing all the unexpected colors added.
Thanks Chris. I love color.
Thoroughly enjoyed this description of the process behind your portrait. Thanks for sharing.
Thank you for visiting my blog! I hope the tutorial was helpful to you.
Love the step by step instructions. The face is very well shaded and the tones are excellent.
Thanks! I appreciate your comment.